Action button Close button

Forgot your password?

Please enter the email address and we'll send you a link to reset your password.

Sign In

Enjoy exclusive deals, offers, invites and rewards.

Create an account

Enjoy exclusive deals, offers, invites and rewards.

Personal Info

Sign In

Licensing Information

shopping bag
Open menu Close menu Button to open search module Customer icon logged Go to Forgot you password Go to Sign in page Open Shopping cart modal Close modal Remove product from cart
Magnetic Appeal
Facebook - Gelish Instagram - Gelish
Magnetic
Appeal
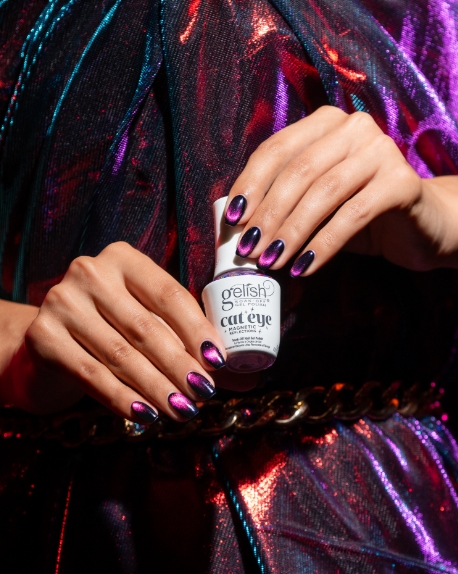
Mastering the magic of Cat Eye Magnetic Reflections gel polish can be tricky, but we give you the tips and tricks you need to perfect your application.
BY GELISH
10.09.24

Those mesmerizing cat eye gel manicures make us stop in our tracks every single time. We just can’t help getting lured into that seemingly endless glitter magic! And the thing about these designs is that they’re actually super easy to achieve … after a little practice, that is. Learning how to manipulate the magnet just right to get different looks is all it takes. And while we know the process can be a little frustrating, we’re here to give you some tricks that will help shorten that learning curve. Follow this guide to ensure that all your designs made with the new Gelish Cat Eye Magnetic Reflections gel are absolutely stare-worthy!

1. Understanding Magnets

Every magnet has two poles: north and south, and opposite poles attract, while like poles repel. You’ve likely experienced this yourself when holding two magnets next to each other: One side sticks while the other side repels. When you bring a magnet close to the magnetic particles in gel polish, the particles move according to the magnet’s magnetic field. Depending on which side of the magnet you use, the particles will either move close to or away from it.
Before you start your design work, play around with your Cat Eye Magnetic Reflections gel on a tip or palette. Use the accompanying magnet in different ways to see how the particles move; you’ll see different results with the round and rectangular end of the magnet. And remember: Never touch the wet gel polish with the magnet! The key is to hover close to it without actually touching. Once you master your magnets, creating designs is so much easier!

2. The Velvet Effect

Velvet is one of the most popular magnetic designs right now, where the nail color looks practically three-dimensional. To achieve this look, apply one coat of Cat Eye Magnetic Reflections gel polish, and cure. Apply a second coat of the same color, but before curing, hover the magnet around all four sides of the nail for a few seconds each to push the particles toward the center. This will give you that awe-inspiring velvet effect.

3. Celestial Cat Eye

As with so many nail designs, what’s old is new again—and the same goes for the original cat eye design. However, what gives it the modern twist is when you create that traditional design with Cat Eye Magnetic Reflections gel, the two-tone color shift, creates an out of this world multi-dimensional effect. After applying the second coat of Cat Eye Magnetic Reflections gel, use the round magnet to push the particles toward the center, starting on one side of the nail and then moving to the other. Keep playing with it until you get a duo-chromatic effect design that you like. Leave it like that or, after curing, add some large glitter flakes or white dots to mimic the stars in a galaxy.
The best part about Cat Eye Magnetic Reflections is that if you don’t like your design, you just wipe it away and start again. Nothing is permanent until you cure!


Get The Products

Blue Eclipse Blue Eclipse 1110550
Can You Candle It? Can You Candle It? 1110552
Green Lights Only Green Lights Only 1110551
Let's Glow Girls Let's Glow Girls 1110549
See available offers at gelish.com See available offers at gelish.com
undefined

Exclusive Offers

Privacy Policy

We use cookies for our Google Analytics, Facebook likes, and to keep an anonymized session. You can find out more on our privacy policy here. Privacy Policy. Go to Privacy Policy

bottle gelish
bottle gelish
bottle gelish
bottle gelish
bottle gelish

Loading

Swatching the right colors for you