Spice and Everything Iced
Baking cookies is a fun way to spend a chilly afternoon indoors. Plus, they can make for wonderful handmade gifts for friends and family. And when it comes to sugar cookies, it's all about the decoration. Here, we look at four different cookie-decorating techniques that will ensure delicious results.
Simple Swirl
If you're not up for detailed decorating, but still want a professional-quality finish,
try this simple swirl technique. For the icing, you'll want to use a sugar cookie buttercream
frosting. You'll also need a piping bag with a large round tip (or a large star tip for
a more floral-like effect).
Fill your bag with the buttercream. Using light pressure on your piping bag, start applying frosting around the outside edge. Then continue spiraling towards the center of the cookie, lifting the bag up once the whole cookie is coated. Finish with a smattering of festive sprinkles to complete the design.

Dip in Glaze
This technique is great for creating a solid base for additional decorations on top,
or if you simply want a thin glazed cookie. Plus, the glaze is simple to make with just
powdered sugar, water and vanilla (adding food coloring is optional), and it dries hard
with a smooth finish.
Mix the glaze until you have a fairly thin consistency, and pour into a shallow bowl. Dip your cookie into the glaze until the entire surface is coated. Allow the excess to drip off before flipping it back over, and place it on a wire rack to dry. Use a toothpick or small fork to pop any air bubbles before the glaze begins to dry.
Pipe With Liquid Icing
This technique usually takes a little practice to master due to the fact that it uses
royal icing (which can be tricky to get the consistency right), but it will give you
bakery-quality results.
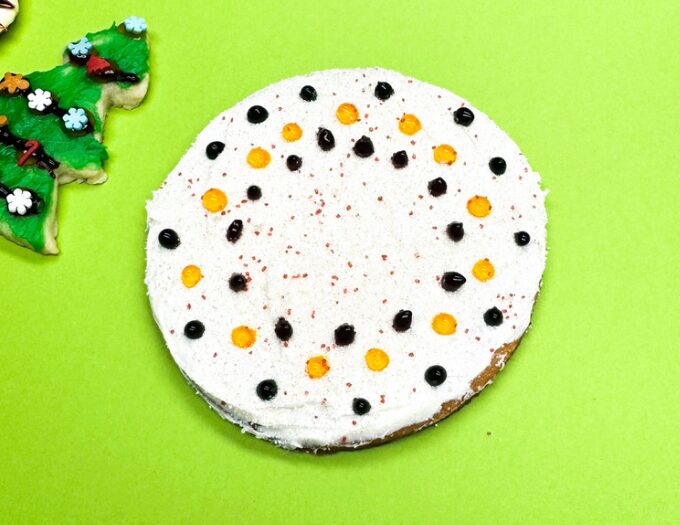
Fill your pastry bag fitted with a #2 round tip with royal icing. You're going to create a border to your cookie first. Gently “touch down” the icing tip to the cookie and apply light pressure. Lift the piping bag about 1 centimeter above the cookie, but continue applying light pressure, and slowly move it along the edge of the cookie. You want the icing to fall onto the cookie, not drag the tip across it. Once you finish the perimeter, work from the outside towards the center filling in the cookie with icing. Use a toothpick to smooth out any gaps and pop any air bubbles.
You can add more detail or colors to your cookie by immediately drizzling or piping on dots for a smooth “wet on wet” technique. Or you can wait until it completely dries to add detail for a more three-dimensional effect.

Dip in Sanding Sugar
If you fear the techniques above leave too much room for error, then this one is right
for you. There's practically no way to mess up this design!
Start by spreading sugar cookie buttercream frosting on the cookie. No need to ensure a smooth finish here. Then immediately dip the cookie into a shallow bowl filled with fine sanding sugar, frosting side down. Gently nestle the cookie in the sugar to ensure all sides and corners are covered. White sanding sugar will adopt the color of your icing, and will leave an almost icy “frosted” effect to your cookie. Take note, however, that while buttercream frosting does develop a slight crust, it won't completely harden so you don't want to stack these cookies.